Service Discovery - Eureka Server and Client
Steps to
Build Service Discovery
EUREKA
SERVER
Step 1
Create a Spring boot project and add dependency
Step 2
Add the spring-cloud-starter-netflix-eureka-server dependency to your pom.xml file
1. Web
2. Actuator
3. Eureka dependency
Step 3
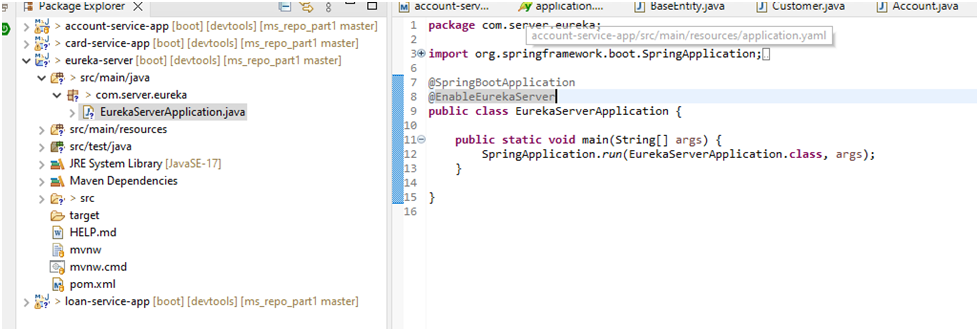
In your main application, annotate it with @EnableEurekaServer.this will enable Eureka Server Functionality
Step 4
Configure Below properties in application.
1. Application name
2. Port number
3. Enable Actuator
4. Erueka Configuartion
· Register with Eureka
· Fetch Register
· Default Zone URL
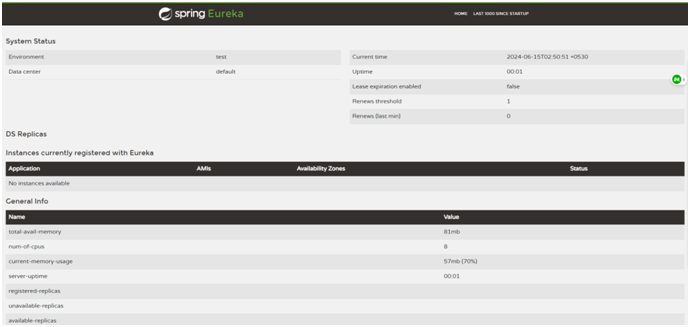
Build and run the Eureka Server: Open a browser and navigate to http://localhost:9002. You should see the Eureka Server Dashboard, which displays information about registered Service instances.
Detailed
Steps
Step 1
File->new ->spring starter project

Step 2
Add the spring-cloud-starter-netflix-eureka-server dependency to your pom.xml file

Step 3
In your main application, annotate it with @EnableEurekaServer This will enable Eureka Server Functionality.
Step 4

spring.application.name=eureka-server: This property sets the name of the Spring Boot application. In this case, it's named "eureka-server". This name is significant when registering with a service registry like Eureka, as it identifies the application uniquely within the registry.
server.port=9002: This property specifies the port on which the Spring Boot application will run. In this case, it's configured to run on port 9002.
management.endpoints.web.exposure.include=*: This property configures which actuator endpoints are exposed over HTTP. Setting it to * means that all actuator endpoints will be exposed. Actuator endpoints provide various information about the application, like health, metrics, etc.
eureka.client.fetch-registry=false: This property configures whether the application should fetch registry information from the Eureka server. Setting it to false means that the application will not fetch registry information from Eureka.
eureka.client.register-with-eureka=false: This property configures whether the application should register itself with the Eureka server. Setting it to false means that the application will not register itself with Eureka.
eureka.client.service-url.defaultZone=http://localhost:9002/eureka/: This property specifies the URL of the Eureka server where the application will register or fetch registry information. In this case, it's configured to use http://localhost:9002/eureka/.
eruka.instance.ip-address=true:
This property configures whether the IP address of the instance should be
included in the Eureka registration information. Setting it to true means that
the IP address will be included.
As Yaml

Eureka Server: http://localhost:9002/
Points to Remember
· If you set fetch-registry: true and register with eureka: true . The server itself act as a application

· If you did not set the default zone in YAML then Eureka default address is http://localhost:8761/eureka/
Eureka
Client
Step 1
User
Existing microservices and add necessary dependency in pom.xml
Step 2
Add the
Spring-cloud-starter-netflix-eureka-client dependency to your pom.xml file
Step 3
Enable the
Eureka client in your main application class by adding the @EnableDiscoveryClient
annotation
Step 4
Configure the Below properties in the application
· Application name
· Port number
· Enable Actuator
· Erueka Configuartion
· Register with Eureka
· Fetch Registery
· Default Zone URL
· Prefer-IP address (only for cloud deployment)
Detailed
Steps
Step 1
User
Existing microservices and add necessary dependency in pom.xml

Step 2
Add the
Spring-cloud-starter-netflix-eureka-client dependency to your pom.xml file
Pom.xml

Step 3
Enable the
Eureka client in your main application class by adding the @EnableDiscoveryClient annotation

Step 4
Configure the Below properties in the application
· Application name
· Port number
· Enable Actuator
· Erueka Configuartion
· Register with Eureka
· Fetch Registery
· Default Zone URL
· Prefer-ip address (only for cloud deployment)

Eureka Server: http://localhost:9002/

How to run the project in multiple instances
Right Click on
project -> Run As -> Run Configuration
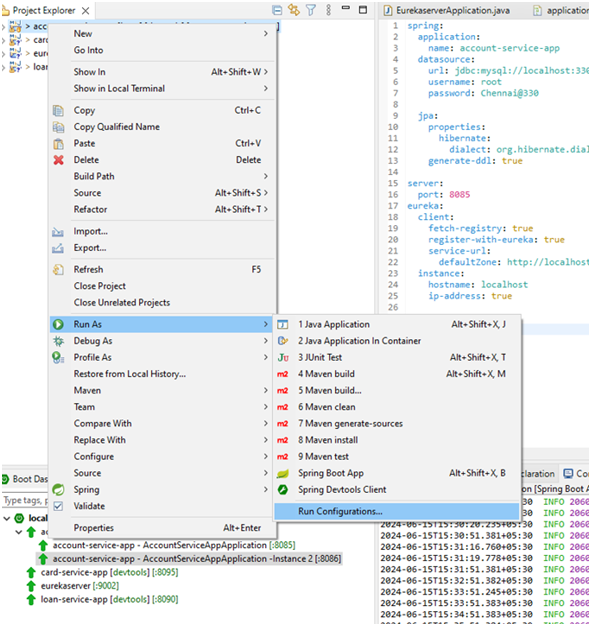
Right-click on the project that needs to run on multiple instances à
Select the duplicate

Change the port
number->click Run

Now two instances of account service are running in different port
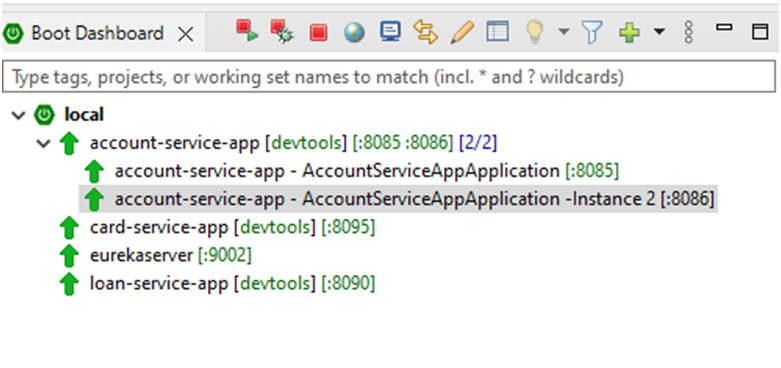
Now two instances are
displaying in the Eureka Server


Comments
Post a Comment